RTG-pi3 Compact Course A3
Compact Course on Deep Learning for Digital Pathology and Inverse Problems
View the Project on GitHub oterobaguer/rtg-pi3-deep-learning
Deep Learning for Digital Pathology and Inverse Problems
Here you will find the course exercises as well as the solutions. If you have any question or find any error please write me an email to otero@uni-bremen.de.
Schedule
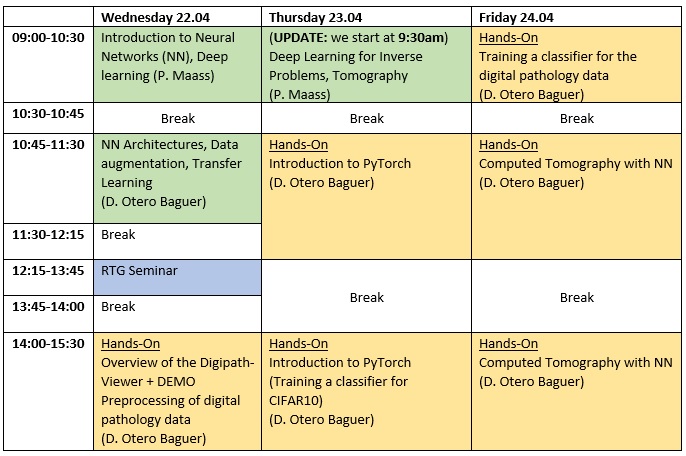
Slides
Introductory slides for convolutional neural networks, data augmentation and transfer learning: slides_daniel.pdf
Data driven approaches for neural networks: inverse_problems_data_driven.pdf
Google Colab instructions
1) Create a google account (if you don’t have one)
You need a google account for using Colab.
2) Open Google Colab
Go to https://colab.research.google.com.
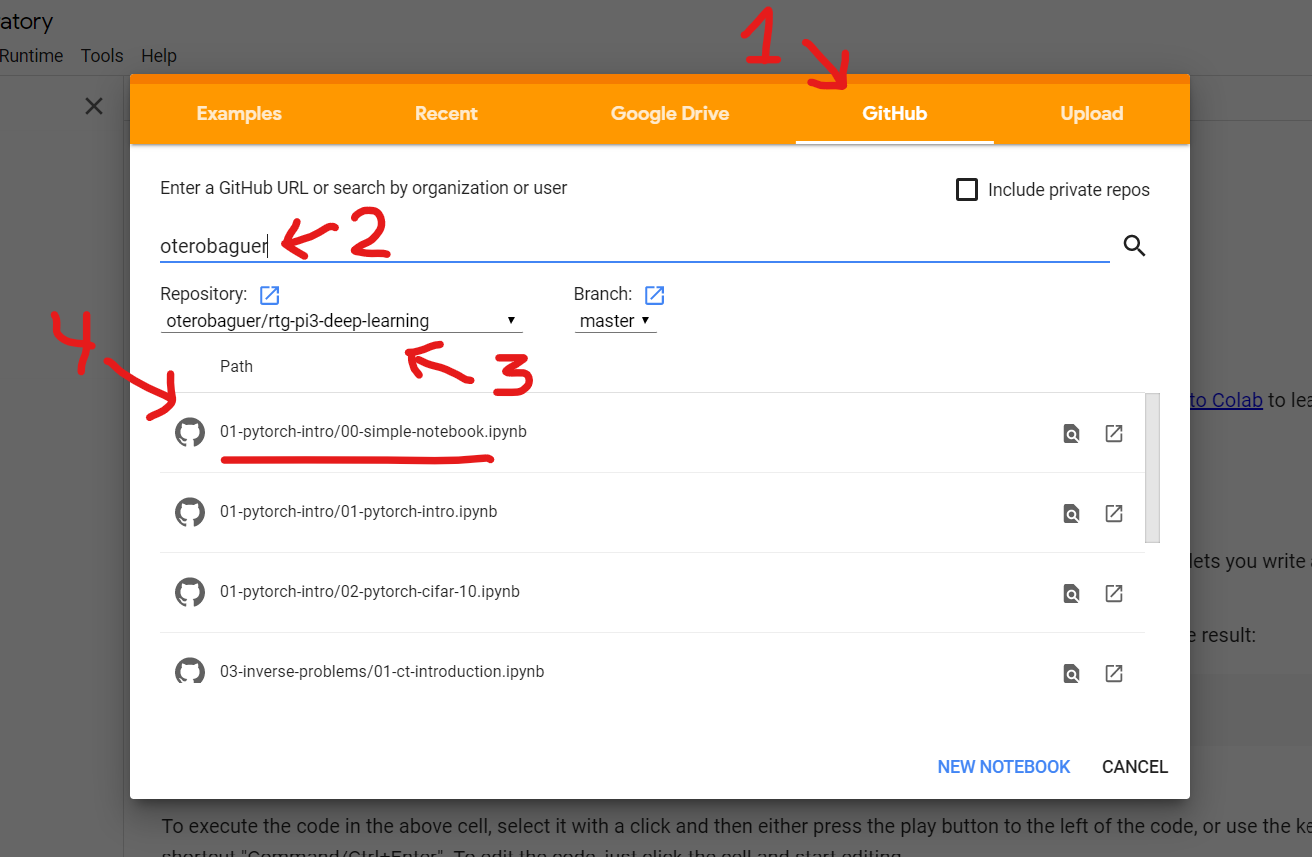
3) Get the notebooks
Select the GITHUB tab (1) and type oterobaguer (2). Then select the rtg-pi3-deep-learning (3) repository (master branch) and try the 00-simple-notebook (4) to verify that it works.
Local installation instructions
We strongly recommend to use Google Colab, specially because the data will be stored in Google Drive, which can be accessed directly from Google Colab without having to download it. In case you want to use your local environment you will have to download the dataset (approx. 10Gb).
1) Create folder for the exercises
If you are using Git, then this happens automatically when you clone the repository, otherwise download a .zip file with the content of the repository and uncompress it. Be careful that you don’t loose your own solutions when updating the folder!
2) Install Python
For the exercises we are going to use Python (we recommend to use the Miniconda distribution).
The installer files for all platforms (Windows, Linux, Mac) can be found in:
https://docs.conda.io/en/latest/miniconda.html
Please download the installer and run it.
-
If your computer has a 64-bit operating system (most likely) select the 64-bit installer for Python 3.7.
-
If your system has a 32-bit operating system (unlikely) you will need to install the 32-bit installer for Python 3.7.
-
If you get asked if you want to add the Miniconda directory to the
PATHselect yes.
Confirm that you have successfully installed Miniconda by opening a console and typing conda. If an error appears then Conda was not added to the PATH. You have to search for the Anaconda Prompt terminal and open it. Then you have to change the directory the terminal is pointing to, using for example cd local_folder\local_folder2, to the directory that contains the exercises.
3) Install required packages
-
Open a console on the folder where you have the repo and create a virtual environment by running
conda create --name dl_intro. -
Activate the environment with the command
conda activate dl_intro. -
The list of required packages is contained in the file requirements.txt. Install all of them by running the command
conda install --file requirements.txt. -
Install
pytorch. If you have a supported Nvidia GPU on our system runconda install pytorch torchvision cudatoolkit=9.0 -c pytorch. Otherwise just runconda install pytorch torchvision -c pytorch.
4) Run Jupyter Notebook
When everything is installed open a terminal on the exercises folder and run jupyter notebook.
6) Remarks
The jupter notebooks in the repository are designed to work in Google Colab, if you want to use them locally you might need to do some changes.